Getting Started
First follow the installation instructions, then come here to learn how to use AstroPhot for the first time.
Basic AstroPhot code philosophy
AstroPhot is a modular and object oriented astronomical image modelling package. Modularity means that it is relatively simple to change or replace one aspect of the code without breaking everything else. A modular framework makes the code extensible to a wide range of photometry applications, though it comes with a small performance penalty (which is made up for by the powerful pytorch backend). As an object oriented package that means the code can be interfaced more intuitively. For example if you have two image objects image1 and image2 it is possible to combine them with a plus sign: image3 = image1 + image2 and the behaviour should be as expected. Most interfaces to AstroPhot functionality have relatively intuitive names and try to behave the way you would expect. This makes the experience more user friendly hopefully meaning that you can quickly take advantage of the powerful features avaialable.
One of the core components of AstroPhot is the model objects, these are organized in a class hierarchy with several layers of inheritance. While this is not considered best programming practice for many situations, in AstroPhot it is very intentional and we think helpful to users. With this hierarchy it is very easy to customize a model to suit your needs without needing to rewrite a great deal of code. Simply access the point in the hierarcy which most closely matches your desired result and make minor modifications. In the tutorials you can see how detailed models can be implemented with only a few lines of code even though the user has complete freedom to change any aspect of the model.
Install
For most users, you can just run:
pip install astrophot
If you wish to help with the development, then see the contributing guide.
Using the Tutorials
The easiest way to get started using AstroPhot is to try running the jupyter notebook tutorials. Simply make a new directory where you want to run the tutorials then run the:
astrophot tutorials
command to download the AstroPhot tutorials. If you run into difficulty with this, you can also access the tutorials directly at Tutorials to download as PDFs. Once you have the tutorials, start a jupyter session and run through them. The recommended order is:
GettingStarted
GroupModels
FittingMethods
ModelZoo
JointModels
CustomModels
AdvancedPSFModels
When downloading the tutorials, you will also get a file called simple_config.py, this is an example AstroPhot config file. Configuration files are an alternate interface to the AstroPhot functionality. They are somewhat more limited in capacity, but very easy to interface with. See the guide on configuration files here: Configuration File Interface .
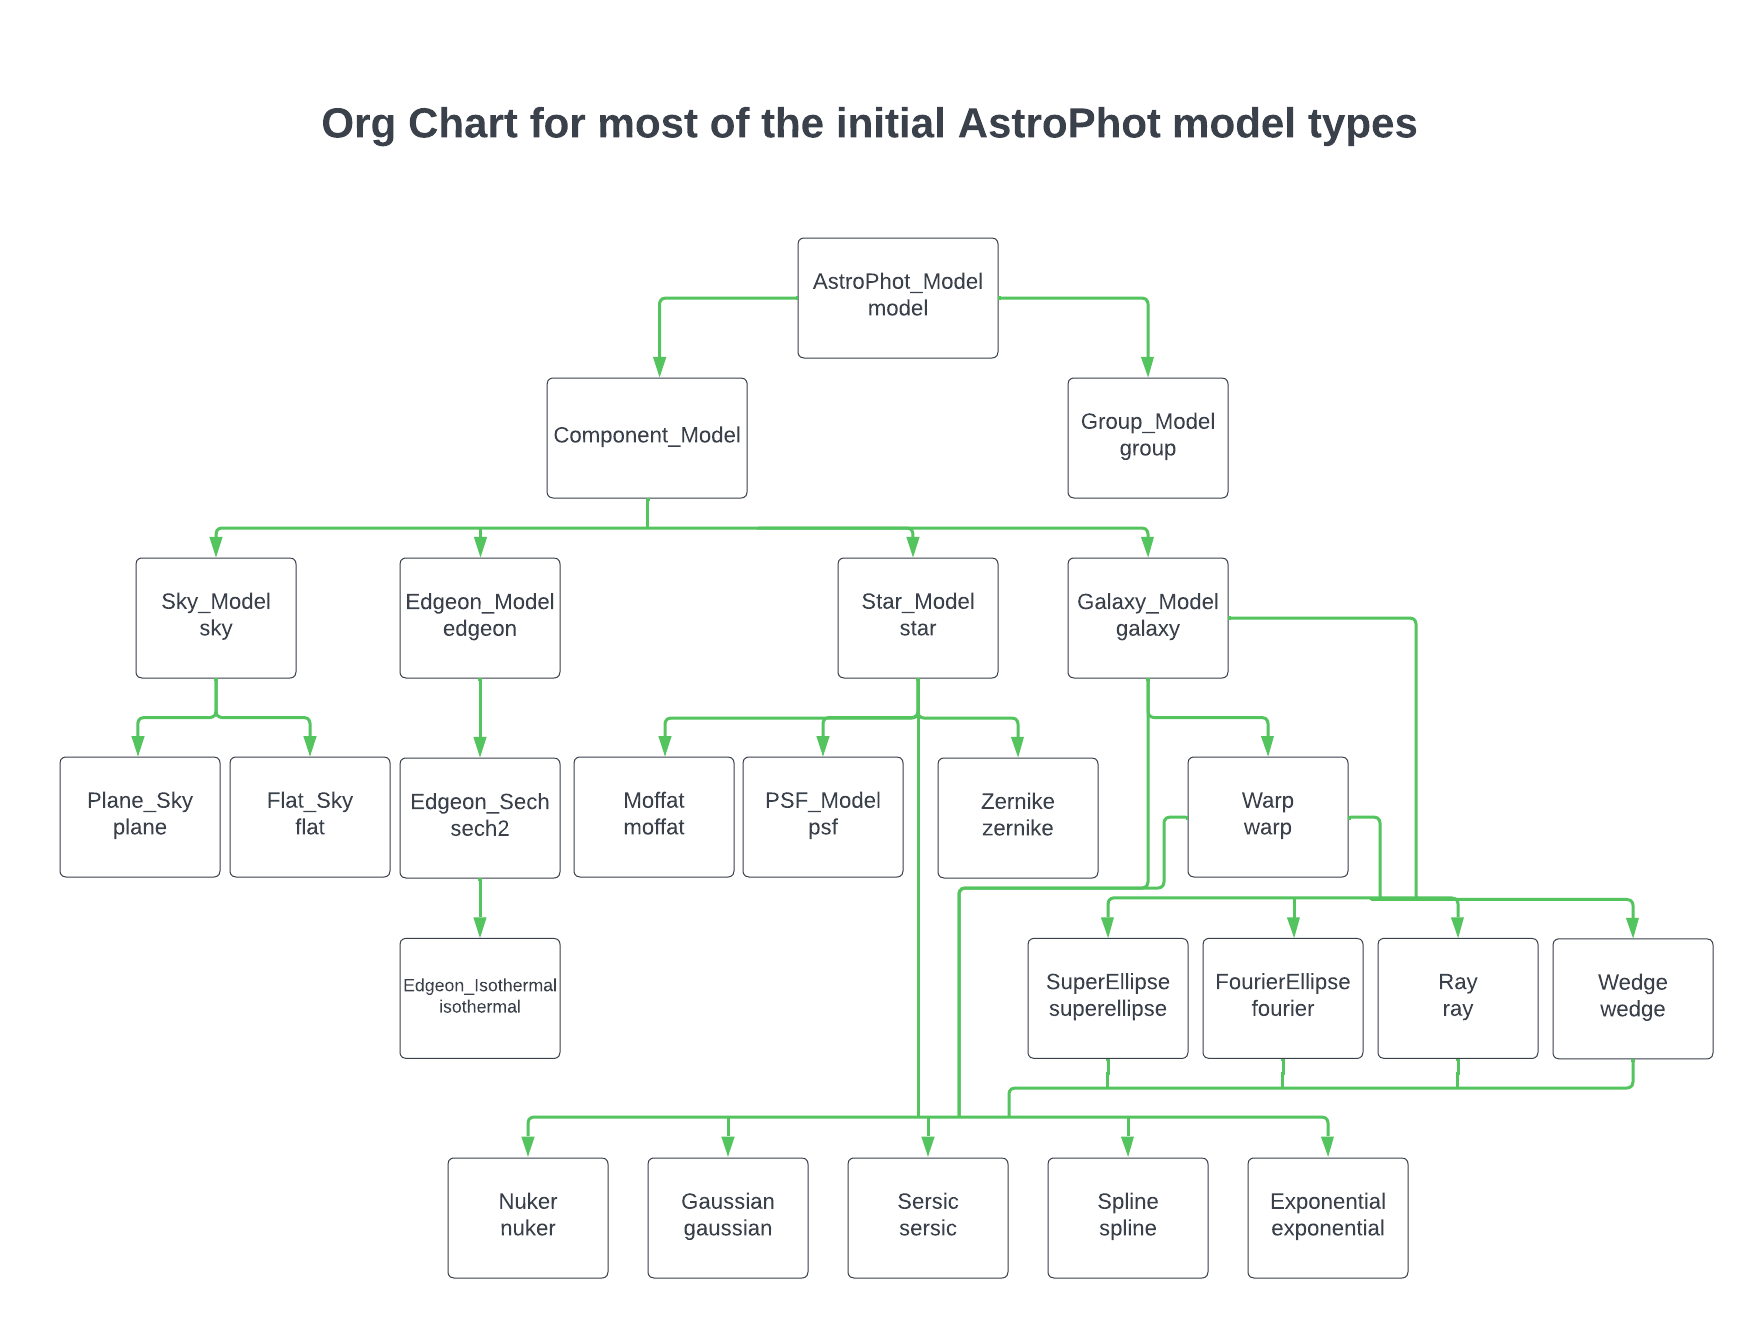
Model Org Chart
As a quick reference for what kinds of models are available in AstroPhot, the org chart shows you the class hierarchy where the leaf nodes at the bottom are the models that can actually be used. Following different paths through the hierarchy gives models with different properties. Just use the second line at each step in the flow chart to construct the name. For example one could follow a fairly direct path to get a sersic galaxy model, or a more complex path to get a nuker fourier warp galaxy model. Note that the Component_Model object doesn’t have an identifier, it is really meant to hide in the background while its subclasses do the work.
Detailed Documentation
Detailed documentation can be found by navigating the astrophot link tree on the left. Currently it is not very organized, but detailed information can be found on just about every AstroPhot system there. Further organization will come to make it easier to navigate. For now you can also just search the model type you are interested in, in the search bar.